Monday, March 30, 2015

DESSERT FOR ALZHEIMER'S IDAHO SUPPORT GROUP


Last Friday night was the support group meeting for Alzheimer's Idaho (local grassroots organization) and if you follow this blog you know I make the dessert for them each month.
This month I let the Peep do the talking for me. I made this little sign in Corel Draw, cut around it and attached a little bamboo skewer to the back and inserted into one of the cupcakes on the pretty tray.
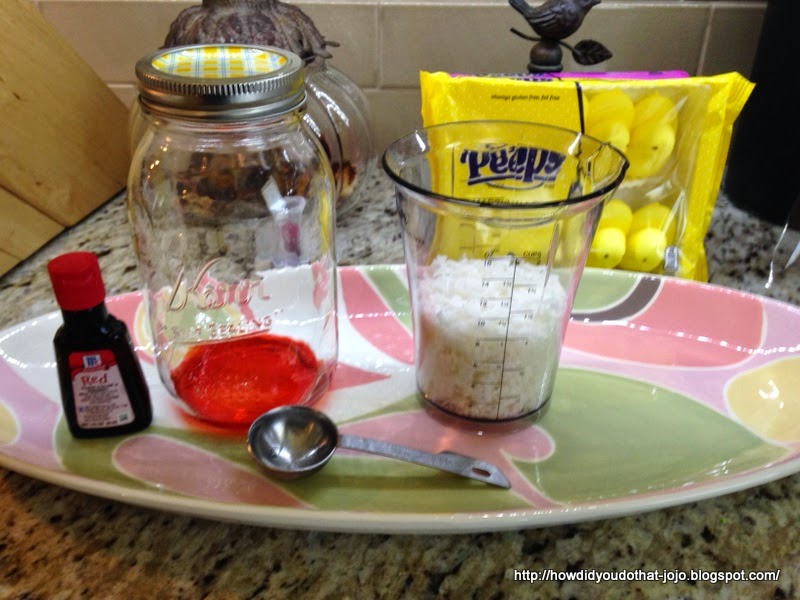
The first thing to do is to color the coconut.  To a quart jar add 1 tablespoon of water and then food coloring - I wanted pink so I added 3 drops of red.  Shake the water and the food coloring and then add 1 cup of coconut to the water/food coloring mixture. Now cue Soul Train Shake Your Booty and shake, shake, shake.
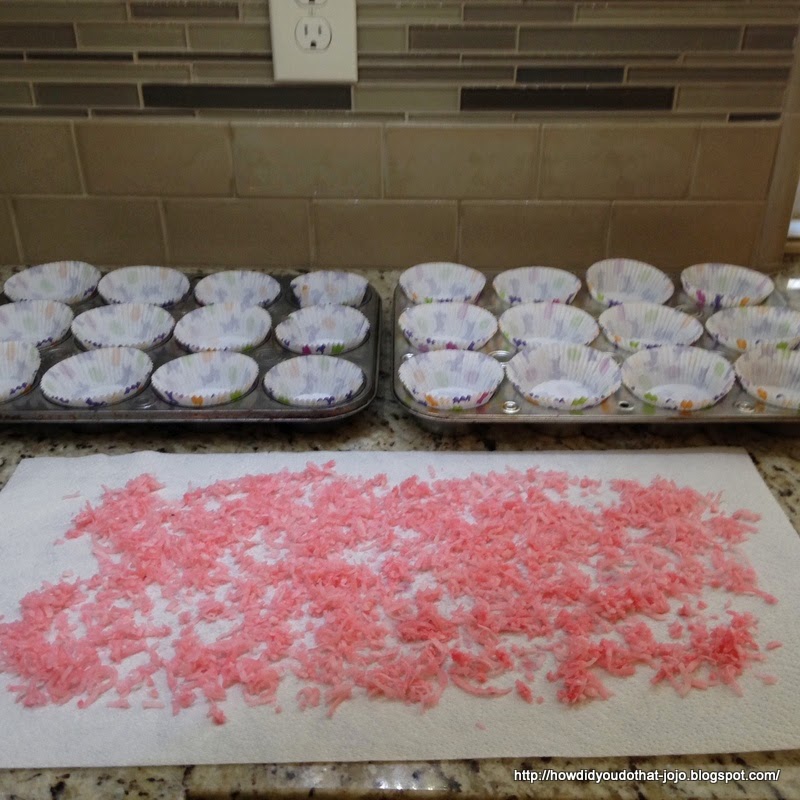
Spread the coconut on some paper towels and set aside to dry.  If you need it right away you can put on a cookie sheet and set in the oven with ONLY the oven light on - if you try and dry this with the oven on you will end up with brown coconut.
Make the vanilla cupcake mixture and fill the cupcake papers 3/4 full.
When the cupcakes are cool enough to handle but still warm, run a round nose spreader/knife like this all around the cupcakes and it will loosen the edges and the cupcakes will come out without the edges sticking to the pan.
Using this little gadget by Cuispro makes a snap out of creating the space for the filling. A good way to spend $2 and free shipping.
Using a #2A round pastry tip was the perfect size and made using this yummy French pastry cream a snap.
Once they were filled I used a large #9 pastry tip for the frosting.  Using this large tip you can frost a dozen cupcakes very quickly.
Ready for the Peeps and the coconut.
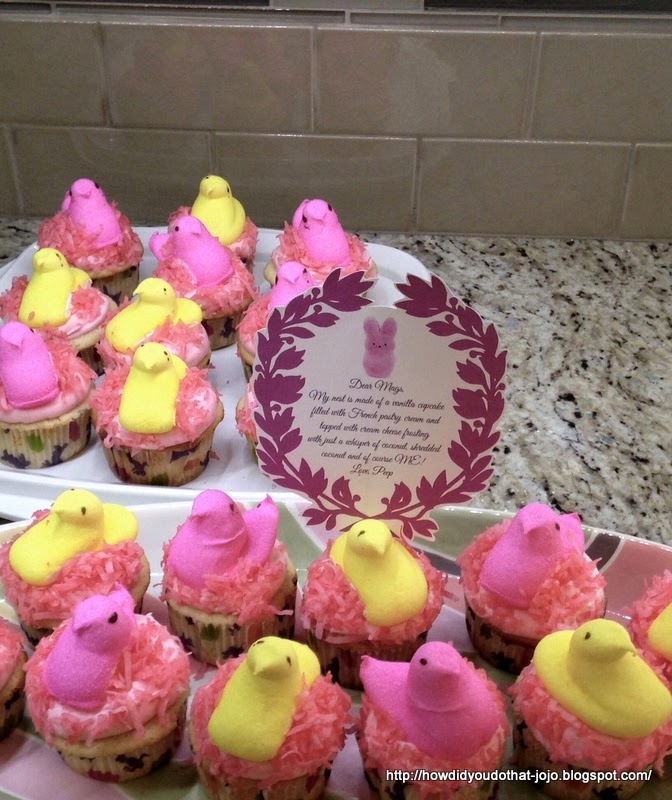
Put the Peeps in first and then use the coconut to cover the white area that happens when you cut the Peeps apart.  I used kitchen shears to cut the Peeps apart.

Recipes:

Vanilla Cupcake - This is my favorite vanilla cupcake recipe, very easy and just as fast as a mix (almost) and oh so much better. Recipe is for 12 cupcakes so I doubled to make mine today.

1 1/2 cups a/p flour (I always use King Arthur)
1 1/4 t baking powder
1/4 t salt
1 stick butter, softened
1 cup sugar
2 large eggs, at room temp
2 t vanilla extract
2/3 cup whole milk, at room temp

Preheat oven to 350° - line your baking tin with cupcake papers. Add to a bowl the flour, baking powder and salt and whisk them together. In your mixer bowl beat the butter and sugar with the paddle attachment on medium speed until fluffy, about four minutes. Add in the eggs one at a time, scrape down the bowl as needed. Add in the vanilla then reduce the speed of the mixture to low; add in 1/2 the flour mixture, then all the milk, then the remaining flour mixture until it is combines.

Add the batter to the cupcake papers, 3/4 full. Bake until toothpick comes out clean 18-20 minutes, depending on your oven.  Mine are ready in 18.

Loosen around the edges and transfer to a rack to completely cool. 

Cream Cheese Frosting: - This recipe is enough for 24 cupcakes.

1/2 cup butter, softened
8oz cream cheese, softened
1 t vanilla - for this recipe I added a few drops of coconut extract.
4 cups powdered sugar

In your mixer combine the butter and the cream cheese until light and fluffy, then add the vanilla and turn the mixer to low and gradually add the powdered sugar.  Once it is all combined then turn up the mixer and just let it run for a few minutes until you have beautiful, fluffy frosting.

French Pastry Cream: This is the stuff you find in a hoity-toity bakery where the goods cost as much as a trip to the movies! My hubby loves custard and he loves this pastry cream.  For the best results you need to make it a day ahead and the flavors meld and it just has a much richer flavor.  The recipe makes a lot and I have put the left over in the freezer, hoping it will keep and be good to use in between layers of a cake for Easter.  I will come back and leave a post to say if it worked or not.

French Pastry Cream:

2 cups whole milk
1 vanilla bean or 1t vanilla paste
6 egg yolks
6oz sugar
1 1/2 ounces of cornstarch

If you are using the vanilla bean, put the bean in the milk and heat the milk and then turn off the heat and let the milk cool.  If you are using the vanilla paste just add the paste to the whole milk and whisk to combine.

Beat the egg yolks, sugar and the cornstarch with your mixer until it has thickened. Pour the egg mixture into the milk and vanilla and whisk to combine and then slowly heat while CONSTANTLY stirring with a whisk, just when you think nothing is happening it will be to a boiling point and start to thicken - take it off the heat (you don't want it to burn) and continue whisking.  Once it has thickened cover with plastic wrap so that a skin will not be created.  Place in the fridge - preferably for a day before using.

This is great in between cake layers, cupcakes, pastries, etc.


Resource

Plate, HomeGoods
Easter cupcake papers, Walmart
Cuisipro Cupcake Corer, Cuisipro Cupcake Corer
Graphic boarder on sign, The Graphics Fairy
Font on sign, Great Vibes

Thank you for stopping by.


Friday, March 27, 2015

BARN WOOD BUNNY FOR THE PORCH

Today's post is once again, a collaboration between hubby and myself.  We still have a little of the barn wood we sourced last summer and I needed three bunnies, one for me and two for gifts for the DIL's.

The fist thing I did was to get a piece of the barn wood (it is 2" thick). He was a little too big for an 8 1/2 x 11 piece of paper so I think you can see where I taped two pieces of paper together to have the width needed for the pattern. Bunny is approximately 9 x 9 x2. Note the black Sharpie ink on the pattern as it was just laid on the wood and drawn around with a dark Sharpie and cut out using a scroll saw.
Here's bunny! The barn wood has all of it's natural age marks, cracks, dents, etc. bunny could stand alone but at the least a paint treatment will need to be done to the newly exposed wood cut from the saw.
I painted him a pale yellow and using a brown Slick Writer (Sharpie would be OK too) I outlined him and gave him an eye - does not matter how this looks as another coat of paint and lots of sanding ahead - I just wanted to see if the lines gave him some character.
Hubby added the chain so we could hang on the black arrow and make sure the scale was correct.  I then went to my little Annie Sloan paint collection and found this yummy Lady's Slipper blue.  I am not a blue person but I think this color is just luscious and I love it - love all her colors and the names too. I know it is expensive but I have tried a couple of the wannabes and hers is just the best as far as I am concerned.  I am almost out of my beautiful red Emperor's Silk - only one Annie Sloan seller in Idaho and it is hundreds of miles from me.  I called that store and 4oz jars are $11.95 plus shipping.  I tend to like the small jars to keep around for projects but if you are doing a piece of furniture, etc. you would want to get the quarts. I looked on Ebay and found an 8oz jar of the Emperor's Silk for $24.49, no tax, free ship, priority shipping and it will be here this week. For small projects the smaller amounts are great and you don't have to worry about it drying up and going bad.  I use every last drop.
Lots and lots of sanding - going to the garage and using hubby's little hand electric sander for the other two! Then a light coat of Annie Sloan's dark soft wax, let it dry and then rub, rub, rub. If you don't have any wax you could lightly (just some random light brush strokes using only the end of the brush, sort of like a dry brush treatment) poly stain and then give it a light sand after it dries. Another treatment would be to paint him white, let it dry and then do a coat of watered down pink, let it dry, then watered down yellow, let it dry and then sand and do the poly stain treatment.
This piece of wood happened to  have a nail hole in a good position for the eye so I just enhanced it a little and lightly added the little break in the ears and around the feet.  My kind of craft - no rules, it's your bunny do what you want!!
I may, at some future time give bunny another treatment using pink as he sort of fades into the green color of the house but for this year bunny is at home.

Resource

Bunny pattern, feel free to copy and paste for your own use and if you want it bigger take it to a copy shop and have it enlarged.
Chain, hardware stores and online
Annie Sloan paint and wax, online sellers, Ebay, speciality shops.
Brown Sharpie, craft stores
Barn wood, check newspaper, Craig's list and if you have an architectural salvage place in your area check with them.

Thank you for stopping by!

Wednesday, March 25, 2015

BUNNY CHARGER PLATE


A quick post showing another use for an inexpensive charger.  I spotted this charger for $1 because it was the last one - it was mine.
I Set the charger in a little stand to see if the scale would be correct for my entry table Easter decorations.
Next step was a trip to The Graphic's Fairy to pick up a frame and adorable bunny girl with her Mary Jane's and Easter bonnet - isn't she adorable?  She is one of many graphics from their Premium Membership for Easter - it was hard to choose they were all so cute. After doing my design work in Corel Draw I printed out the graphic on waterslide paper, let it dry for half an hour to make sure the ink is dry before a couple of coats of Krylon matte finish.

Last check - cut out the decal and placed on the charger to make sure the scale was correct.
After allowing the decal to dry, process in the water and place on your item - then once completely dry one more spray of matte finish.  If you use the waterslide decals be sure to read the instructions completely before starting your project.

Resource

Graphic, The Graphic's Fairy Premium: Link 
Bunny Girl in Pink Gingham on a card:Link
Waterslide Decal paper, Robin's Eggcereta: Link 
Charger, Hobby Lobby
Krylon Matte Finish, Hobby, craft and hardware stores
Egg cups and egg candles, Pottery Barn
Wire cloche, Antique Farm House
Bunny, HomeGoods

Thank you for stopping by.


Monday, March 23, 2015

EASY SPRING BOUQUET

The St. Pat's decorations are down and put away until next year and holy moley Easter will be here soon (Sunday, April 5th) so I am busy decorating and crafting for Easter. I envisioned a spring bouquet on my entry table so I got busy and made one and thought I would share my process as it is the same for any arrangement.
The first step (after thinking about your design, in my case I wanted an airy arrangement with spring flowers, greenery and curly willow) is to gather your supplies - greenery, flowers, curly willow, florist foam, glue, GOOD needle nose pliers, some raffia and if needed some rocks or glass beads if you need to weigh down your arrangement for stability.
Cut the greenery and flowers off of the stems using the needle nose pliers - sometimes the wires are so thick I have to have my hubby cut them for me.
I just happened to have this bunny cookie jar from a long time ago trip to HomeGoods so I took off the lid and then glued several blocks of florist foam to the inside.  Then I started with the bottom greenery - just have to push it into the florist foam. Remember all these artificial flowers and greenery have wire in them so bend them and arrange until you are happy with the way they look.
I chose pink Calla Lilies as my focus flower - cut the first flower to the height that looks in scale for the container and then work from that height.
Added the additional four Calla lilies (remember to use an odd number as in nature).
You just keep building on your original flowers - I added some tulips, cherry blossoms, apple blossoms and curly willow as well as the greenery at the bottom - lastly added a little raffia bow for some additional texture and natural color.  All of these stems, including the curly willow, came from the craft store.
I fully realize that not everyone will have the just right container or want to spend money on one - I made this container from an empty paper coffee can, a printed sheet of a pattern I found online (it is actually a sample of a finish for a table), printed it out on an 81/2 x 11 full sheet label, trimmed it - it did not go all the way around the can so I used the part I cut off the top to finish off the back, tied on a little raffia and added a couple of sprigs of greenery.
This is the can that I used and what the print out looked like - you could use wrapping paper, scrapbooking paper, whatever you like. I found it easier to print out on a label as I then avoided having to glue onto the can.
If you make your own container like this you will need to Glue in the first block of florist foam and then pour in the rocks/glass beads for stability and then add the additional foam.  The florist foam shown here and the glass beads are from the $ store.

I purchased all of my flowers and greenery at Hobby Lobby and made sure I bought them when they were 50% off.  The $ store does carry a lot of artificial flowers and Walmart's have a floral section.

Resource

Bunny Cookie Jar, HomeGoods
Florist rocks, IKEA
Florist foam and glass beads, Dollar Tree
Artificial flowers, greenery and curly willow, Hobby Lobby

Thank you for stopping by.

Friday, March 20, 2015

CORNBREAD WITH A TWIST

I like cornbread and some foods just need cornbread - like a beautiful pot of homemade heirloom beans, they cry out for a some cornbread and a nice salad. What I don't like about most cornbread is the texture - pick up a slice and it usually falls apart. That stands to reason because it is not a yeast bread so really it is more like a "corn cake."  I even bought one of those cast iron pans that makes little pieces of corn like corn on the cob but they were just a little too much of a novelty and not enough cornbread.


There are actually two "twists" to this recipe.  One is an ingredient and the other a procedure.  The recipe calls for whole grain kamut flour.  I will be the first to admit I had not heard of kamut flour. As it turns out Kamut is a brand name for khorasan wheat. It is described as having a more nutty flavor than regular wheat flour. If you cannot find it at your grocery try the health foods store.  I ordered mine online. The second twist is that you need to plan a little in advance before making this as you put the cornmeal in a cup of the buttermilk overnight in the fridge the day before making.  We liked this so much that I am going to double the recipe next time and freeze one loaf.
The recipe comes from Josey Baker owner of The Mill bakery in San Francisco. Thank you Josey for sharing this wonderful cornbread recipe. I did exactly as the recipe called for - but the recipe states that you could substitute whole wheat pastry flour for the kamut.
Ready for the oven.....
In my oven, 45 minutes and it was yummy brown and a little crisp on the edges and the bread was done perfectly, moist but does not fall apart - hubby says "best cornbread I have ever had."  OK, that's it with an accolade like that I am not looking any further for a cornbread recipe.

Recipe from Josey Baker:

3/4 cup cornmeal - I used Bob's Red Mill medium grind
2 cups buttermilk, divided
1 cup kamut flour (recommended but may substitute whole wheat pastry flour
1 T baking powder
1/4 t baking soda
3/4 t fine sea salt
3 T unsalted butter, divided (I just use salted butter)
1 T plus 1t honey
1/4 cup firmly packed dark brown sugar 
1 extra large egg

The night before making the bread combine the cornmeal with 1 cup of the buttermilk in a small bowl. Cover it and put into the fridge overnight. The next day, take the soaked meal mixture out of the fridge an hour before proceeding with the rest of the recipe.

preheat oven to 375°

In a large bowl, whisk together the kamut flour, baking powder, baking soda, and sea salt. Set aside. (I used my mixer)

Melt 1 1/2 tablespoons of butter in a small saucepan over medium heat. Pour the melted butter into a loaf pan (8x4 inches) and use a pastry brush to coat the bottom and sides of the pan.  Some butter will pool in the bottom of the pan, that's okay.  In the same saucepan, melt the remaining 1 1/2 tablespoons of butter, add the honey and stir it all together.

Add the dark brown sugar, the remaining cup of buttermilk and the egg to the soaked cornmeal mixture.

Add the cornmeal mix and the honey/butter to the bowl with the dry ingredients and stir it all together for at least 60 seconds (again, I used my mixer).  You want to give it a nice, good beating.  It should be the consistency of thick pancake batter.  Pour the batter into the prepared loaf pan.

Bake the bread for 45-60 minutes (keep an eye on it mine was done perfectly at 45 minutes), rotate the pan at the mid-point. Use a toothpick to test.  Let cool in the pan for five minutes, then turn out on a rack to cool.  Serve warm with salted butter.  It also makes good toast.


Resource

Recipe source, Josey Baker
Kamut flour, Link, 
The link above is to iHerb, a California company that I have purchased items from several times. Reasonable and very fast shipping.

Thank you for stopping by. 


Tuesday, March 17, 2015

HAPPY ST. PATRICK'S DAY!!!

HAPPY ST. PATRICK'S DAY, HAVE A WONDERFUL DAY AND THANK YOU FOR STOPPING BY!!!  DON'T FORGET TO WEAR GREEN!!

Sunday, March 15, 2015

ASIAN FOOD AT HOME!


Several years ago my clever sister shared with me that she had some Asian plates, etc. that she used to set a special table for take-out Chinese food.  I thought what a great idea and I was on the look-out for some dishes for hubby and I.  Just seems at the time that these were very easy to find at HomeGoods, Marshall's and World Market.  I have not seen them lately but that does not mean they are not available. Most Asian grocery stores also carry a line of plates, cups, serving platters and bowls. If you have a restaurant supply store in your area they generally sell to the public.

 Table set...
 I love the heavy Japanese cast iron teapot.  Makes a great cup of jasmine tea.

MENU

Chicken Lettuce Wraps 
Butter Lettuce
Brown Rice
Stir Fry Asparagus and Onions
Trader Joe's Chicken Gyoza Pot Stickers
Trader Joe's Gyoza Dipping Sauce
Spicy Dipping Sauce for Lettuce Wraps
Jasmine Tea

Cooks notes:  We love brown rice and that is mostly what we have when we have rice (OK, I admit we do LOVE chicken Rice-a-Roni) but the rest of the time it is brown rice which does take much longer to cook.  I have had a rice cookers for what seems like forever my first one was not sealed and when I made rice that little cooker made a whole lot of noise (clink, clink, clink the bouncing lid hitting the top of the cooker) and it took a very long time to cook.  Once we discovered the "Zoj" we were sold.  We had purchased the larger, stainless steel unit and then one day at Costco discovered they had a smaller one and we bought it because we thought that for traveling and staying in condos it would be great - it's the one we use all the time now. It also works just great for steel cut oats, other types of rice, etc.

Zojirushi Rice Cooker

I think they cost a little more than other rice cookers but oh so worth the money.  One great feature is that once the rice is cooked it goes to a warm cycle for a long period of time, so if we are having rice for dinner, about 3:00 I will put the rice on to make sure it is ready for dinner - brown rice is one of those things you don't want to forget to put on for dinner, because it takes so long to cook.

Recipes

Chicken Lettuce Wraps
2 1/2 Pounds of boneless, skinless chicken tenders, diced*
1 Large onion, diced
1 small can of water chestnuts, diced
2 cloves of garlic, minced
2 Tablespoons of fresh ginger, minced
2 Tablespoons of low sodium soy sauce
2 Tablespoons of rice wine vinegar
Bunch of green onions, finely chopped
1/2 cup of shredded and then chopped carrots
1 tsp sesame oil
1 Tablespoon of Thai sweet chili sauce (or more to taste)
1/4 cup prepared hoisin sauce 

*Trim off any fat or gristle left on the tender

Using about 1-2 Tbls of cooking oil cook the diced chicken until cooked through. Drain off any remaining grease & liquid (I draw it off with a turkey baster) and then add the onion, ginger & water chestnuts, cook until the onion is translucent, then add the hoisin, garlic, soy sauce, Thai sweet chili sauce and the vinegar - once you know the chicken is done you can set aside until ready to serve.  Just before serving heat up the mixture and then add the green onions, sesame oil and carrots, stir until the onions and carrots are a little cooked - ready to serve a la taco style in the bibb lettuce.  You can use iceberg lettuce but I prefer to use the bibb as it holds up better to the mixture and is easier to eat and tends to fall apart less.

This will serve at least (4) people, we always have lots of leftovers with just two people - we will have two dinners out of this meal.

Stir Fry Onions & Asparagus

One pound of fresh asparagus
One large sweet onion (if not available a yellow onion will do)
Olive oil
Sea salt
Fresh ground pepper

Chop the onion into a medium-large dice, wash the asparagus and cut off the woody ends and cut on the diagonal.

In a frying pan with some EVOO add the onions and cook for a bit and then add the asparagus and stir until the asparagus is just done - not too done.  Season with sea salt and fresh ground pepper.

Pot Stickers & Dipping Sauce
If you don't live near a Trader Joe's you can find pot stickers in the freezer section (just follow the instructions on the package) of most grocery stores and most grocery stores will have an Asian food section with a selection of sauces. When we had this dinner I made a sauce for the chicken wraps - a la PF Chang's and used the Gyoza sauce for the pot stickers. If you look online you will see lot's of knock off recipes for the PF Chang's lettuce wrap sauce. I just made a mixture of low salt soy sauce, some artificial sweetener (or sugar), water, a little of the sweet Thai chili sauce, etc. whatever suited my fancy at the time.

Let's eat!


A nice addition would be chop sticks but we do better with a fork!  Personal preference, most of all bon appetit!

Resource

Gyoza dipping sauce & pot stickers, Trader Joe's
Rattan mats, Pier One
Red Mats, HomeGoods
Cast iron tea pot, Oriental goods stores and specialty stores, World Market
Zojirushi Rice Cooker, Zojirushi NS-VGC05 Micom 3-Cup (Uncooked) Electric Rice Cooker and Warmer
Asian plates, bowls & serving dishes, HomeGoods & World Market

Asian chargers, Hobby Lobby
Napkins, Williams-Sonoma


Thank you for stopping by.