Wednesday, September 17, 2014

HALLOWEEN TABLESCAPE - HELLO KITTY!

I had a little time this morning between chores and thought I would go ahead and plan my Halloween tablescape.
First things first - laid down a plain white linen tablecloth and then topped it with my find from after Halloween last year, my beautiful spider web cloth - it was either Grandin Road or Ballard Designs catalog  it was marked way down and I snapped it up for this year.  It could be used for other things like decorating another type of table, etc.
Next came the chargers, dinner plates, salad and dessert plates, wine and water glasses.
Time for the pretties - the place cards, napkin rings and napkins, centerpiece and candles.  These kitty place cards so easy and you do not have to have a draw program to make them.  I moseyed over to The Graphics Fairy and found the kitty and copied and pasted him/her into a black lined square 3.117 x 3.15." If you don't have a draw program and want to make these just add him to any word processing program and then print them out on cardstock and cut.  Added the name (you could just write the name) and then poke a hole just above his ear for your scissors, cut around him and then fold the cardstock over and run a bone folder over the edges for a crisp edge and you have a really cute place card.
 Back view of the place card.
 Now for the napkin ring - used my old, easy trick of cut cardboard tubing and made the napkin rings.  Simply cut either cardboard or plastic tubing about 1 1/4," file the edges and get out the glue gun.  I cut the length of ribbon and put a dot of glue on the cardboard/plastic, attach one end of the ribbon, bring it around and add another dot of glue on the ribbon and attach to the cardboard/plastic.

 Simple napkin ring with crisp white napkin.


Added the flatware and a couple of little cauldron shaped candle glasses and little black polka-dot saucers, needed a centerpiece so I found this pumpkin in my stash and just added a bow from the polka-dot ribbon used on the napkin rings and I think we have a tablescape for a fun Halloween dinner!

Resource

Orange polka dot salad plates, Isaac Mizrahi, Macy's
Black dinner plates, Living Color
Flatware, World Market
Orange water glasses,  HomeGoods
Spider web cloth, try Bed, Bath & Beyond & other sellers
Hem stitch napkins, Williams Sonoma
Ribbon, Costco
Orange goblets, by Moonlight
Orange dessert plates, 222 5th
Orange chargers, Michael's
White table cloth, Bed, Bath & Beyond
Cauldron candle holders, http://www.save-on-crafts.com/
Kitty graphic, http://thegraphicsfairy.com/50-best-free-vintage-halloween-images/ 

Thank you for stopping by.


Monday, September 15, 2014

BUCKET LIST ITEM √ - AFTERNOON TEA AT THE PRINCE OF WALES HOTEL

I only do a travel post if I think I have some good information to share as I did on a Hawaiian trip last spring - places that were unique, special in someway, reasonable, etc. My good information here is not of the particularly reasonable kind (but it could be lots of camping here) but more of a place that I think is quite magical.  I first visited Glacier National Park (In Montana) as a teenager and even though I had grown up going to places like Yosemite and Kings Canyon and Sequoia National Parks I knew this place was special.
We had our plan....we left home with the intention of entering Glacier National Park and driving the Going to the Sun Road into the other part of the Glacier-Waterton Peace Park (the world's first peace park) Waterton, Alberta.  The photo above is what we expected.....
This is what mother nature had planned for us!  The Going to the Sun Road was closed 23 miles into the park so in order for us to get to Waterton for our tea reservations and later our boat ride as well as our hotel reservations we had but one choice - we drove from White Fish, Montana up to Alberta and across Alberta to the Canadian entrance to Waterton Park.  As it often turns out this was a very happy happenstance as we would never have entered the park this way and it was a glorious drive - particularly memorable was the area around Crow's Nest Pass - breathtaking.
We made it to the hotel in time for our afternoon tea and it was lovely. As seen in the photo at the top of the post the female wait staff wear Scottish plaid while the males wear Scottish kilts. A word about the hotel and why it was on my bucket list.  The first time I was here I knew nothing about the hotel - did not even know of it's existence and hoped that at some future time I could come back to the hotel and have afternoon tea.  The hotel was built at the same time as the other hotels built by the rail road companies (like the beautiful hotel in Banff) in the 20's (this hotel built in 1927) to attract visitors to the Rockies rather that the Swiss Alps. We chose not to stay here for several reasons and oddly enough it was NOT the cost. The hotels in the village of Waterton are not inexpensive.  It is a small village and it's season can be quite short.  The Prince of Wales Hotel is closing today for the season. If you read the reviews for the hotel you see a wide array of comments.  Here is my take on the hotel.  For me the pure joy of this hotel (BTW, a National Historic Site) is the fact that it does not change.  
Sorry about the glare on the photo of the then Prince of Wales (later Edward VIII, then after abdication the Duke of Windsor) but I took it inside the hotel. One could see the Duke and Duchess of Windsor in the hotel today looking quite at home taking their afternoon tea as they would have back in the 30's. Where some reviewers of the hotel said "shabby" I say classic.  Even though the hotel would be closing in four days everything was open, clean and nice and the staff very attentive.  Our tea server Megan (see photo at the top) was an adorable girl who had just graduated from college with her degree in Hotel Management and was looking forward to finding her next job after the hotel closes. We did not stay because, as with the beautiful dining room of the hotel staying the same, so have the rooms and the teeny-tiny elevator that only goes up to the 4th floor is original to the hotel. I do believe that they have replaced bathroom tubs, etc. but the rooms remain the same.  The draw for this hotel is the unparallelled view of the Waterton Lakes and the Canadian Rockies and beautiful dining room and the ambiance provided by an attentive staff.
The tables for afternoon tea are right beside the front window so lovely, not stuffy at all no dress code, mountain casual the order of the day. We enjoyed our tea service while listening to a very good musician on the harp.
The hotel is a sentinel on the hill and can be seen from almost any point down in the village.

From the warmth and coziness of the Prince of Wales hotel off to the ride on the International named because the lake is in both the US and Canada and this two hour beautiful trip goes from Canada to the US and back. Our trip was the last trip of the day at 4:00 and we thought those souls who chose to ride on top were quite brave as it was cold. We chose to ride in the outside but covered area in the back. The boat puts in on the American side for a potty break and leg stretching and to let off those folks who have one-way tickets and are going hiking in the US in Glacier National Park.  There is a point of entry US Customs office sitting in the forest to check passports of the hikers. As disappointing as it was to not drive the Going to the Sun road again, it was so wonderful to see so much of Waterton Park.  One of the big draws at Glacier is of course the awesome vistas but also the animals as you will likely see mountain goats, if you look carefully (take your binocks) the big horn sheep on the mountainsides, bears, marmots, pikas, etc. We missed that but we were not more than a mile or two into Waterton when we saw cars pulled over (a sure sign of an animal siting) and this was an easy view as not far off the road was a nice size fuzzy black bear pawing in the snow - the contrast of the black bear and the snow made him/her very easy to see.
Before I go wanted to share one more thing with you and that is this cut-line. The boat stopped at this point so that the commentator could tell us about this line.  By treaty in 1925, an International Committee was formed to maintain a boundary line between the United States and Canada.  The line goes from the Pacific Ocean to Minnesota (on or near the 49th parallel).  We asked "what happens in Minnesota" and the reply was "Lake Superior." Duh, the Great Lakes stops the line.  As we looked to the other side of the lake we could see the line as well as the more familiar stone obelisk marking the border.  On our way home we crossed back over into the US at Kingsgate point of entry, BC, I made a point to look for the cut-line and there it was! Just a little trivia for you!

Glacier-Waterton Peace Park is called the "Crown jewel of the continent" for good reason.  If you have not been you might want to consider putting it on your bucket list.

Resource

Waterton Lakes National Park, Link 
Glacier National Park, Link
The Prince of Wales Hotel, Link

Thank you for stopping by.


Wednesday, September 10, 2014

SAUCE FOR HOMEMADE VANILLA ICE CREAM, OR ANY OTHER ICE CREAM!


Two wonderful, easy to make (well as easy as caramel sauce can be) sauces for ice cream.

The second one is David Lebovitz's recipe and if you don't follow his blog, you might want to take a look.  Here is the link to the chocolate sauce recipe: http://www.davidlebovitz.com/2013/09/salted-butter-chocolate-sauce-recipe/
and BTW, the chocolate for this recipe is available at Wallmart for I think $2.49 a bar and you will need two and a third bars.  Might just tuck the other two-thirds away for a chocolate attack.  Also, if you have not read David's book "The Sweet Life in Paris" it is a great book and a must read before traveling to the city of lights if you are so lucky to visit.

Recipe for the caramel sauce:

Ingredients
  • 2 cups granulated sugar
  • 1/2 cup water
  • 2 tablespoons corn syrup
  • 1/4 cup butter, cut into chunks
  • 1 cup heavy cream
Instructions
  1. Place the sugar, water, and corn syrup in a medium saucepan with high sides, and stir to combine. Heat over medium heat until all of the sugar has melted, stirring occasionally and using a wet pastry brush to remove any sugar crystals that form on the sides of the pan. Increase the heat to high.
  2. When the sugar mixture begins to boil, do not stir. It will take several minutes before the sugar begins to change color, but once that process begins, things will move quickly. If you feel it needs stirring (for example, if it looks like caramelization is not happening uniformly across the pan), move the handle of the pan to gently swirl the contents.
  3. Once the caramel reaches a medium amber color, remove it from the heat immediately. Alternatively, you may allow it to cook longer, until it is more of a bronze color, but note that doing so will result in a darker caramel flavor and a thicker consistency in the final product.
  4. Quickly whisk in the butter, then add the cream and whisk until smooth. The caramel will bubble violently during this stage, but it will settle down once the butter and cream have been completely incorporated.
  5. Though the completed sauce will be quite thin at this point, know that it will thicken at it cools. Using the wet pastry brush in the beginning should have prevented chunks from forming in the caramel, but if there are any, simply strain out the solids using a fine mesh strainer. Pour the sauce into the jar or storage container of your choice and allow it to cool to room temperature, then secure it with a lid and transfer it to the refrigerator where it may be kept for up to 2 weeks. Serve the sauce over ice cream, pancakes, fruit, or whatever your heart desires. If the sauce is thicker than you want it when chilled, you can microwave it for a few seconds to soften it or place the jar in a bath of hot water.
I know, I know the purists say NOT CORN SYRUP but with this recipe you will NOT get crystallization, so I rest my case.

You will also note my recycled jars - the chocolate is in a jam jar and the caramel in a spaghetti sauce jar.  I use Corel Draw for making labels - I will send the leftover sauce home with my company today and that is one of the reasons why I always make a quick label as it is always a good idea to label food you are sending home or making as a gift. 

Resource
The Sweet Life in Paris, The Sweet Life in Paris: Delicious Adventures in the World's Most Glorious - and Perplexing - City
Lindt fleur de sel chocolate bars, Walmart
Corel Draw, CorelDRAW Graphics Suite X7 Academic
Font used on jar labels, Parisian BT


Thank you for stopping by.

Monday, September 8, 2014

GREEN TOMATO RELISH - JACK FROST IS COMING!

It's that time of year, the garden is winding down and what to do with all those green tomatoes before the first frost hits?  Here is my favorite recipe for green tomato relish. Please note that the label says "Sugar Free" I made this batch without sugar using Splenda and it turned out great.  The recipe as given is with sugar, as the original recipe was given to me.
YIELD: 16 1/2 PINTS

1 Pint White Vinegar
1 Quart Sugar - 4 cups
1 tsp Cinnamon
1/2 tsp Ground Cloves
1/4 tsp Cayenne Pepper
1/2 tsp Allspice
Scant 1/3 cup French's Mustard
1/4 Cup Salt
2 Tbs Flour
1/2 Tbs Turmeric
4 Quarts, diced green tomatoes - 16 Cups
2 Quarts shredded cabbage - 8 Cups
1 Quart frozen baby Lima beans - I know, I know, I don't like them either but they are yummy in this recipe. 
2 Green peppers, diced
2 Large onions, diced                                            

Gather all the ingredients that you will need, I always set the Turmeric aside because it goes in later than the other ingredients.
This little gadget is a game changer and if you do not have one they are available for under $20 and come with this little comb to clean out the top part. It is called an "Onion Chopper" and is made by Progressive. My dear DIL, Dawn made me aware of this gadget years ago and it is such a time saver.  I have a Cuisinart, etc. but this is so easy (and goes into the dishwasher) and when you need a uniform dice this gadget is just so quick and easy to use.  It's hard to see in the photo but there are measure marks on the side.  Using this and purchasing bags of already chopped angel hair cabbage (Walmart) takes so much of the work out of this recipe.
Chop the tomatoes, onions, and green peppers, mix them all together with the cabbage.
Put the salt on the mixture, cover with cheesecloth and let them "soak" at least (2) hours or overnight.
When you are ready to make the relish DRAIN off the liquid, put into a large pot on the stove, add the Lima's, and all the seasonings,(EXCEPT the turmeric), the sugar, the mustard, the flour, vinegar and cook for 30 minutes, then add the turmeric.

Be careful and pack relish into sterilized jars, making sure there are no spaces or air pockets. Fill the jars all the way to the top.  Screw on the lids.

Place a rack in the bottom of a large stockpot. Put the jars into the pot, leaving a 2 inch space between jars (I use a rack designed for canning that can be used in the bottom of any large pot), fill with enough water to cover the jars about 2" above the jars. Bring the water to a full boil and process for 30 minutes.

Carefully remove the jars from the pot and place on a cloth covered surface (they will be very hot) several inches apart, until cool.  Once they have cooled press the top of each jar making sure that they have sealed, tighten the rings if necessary.

The flavors of the relish need to "age" or "meld" so please let them rest in a cool place for 2-3 weeks before using.  Relish may be stored for up to a year. Refrigerate after opening.

This relish is especially good on hamburgers, hot dogs and great in tuna.

I created the label in Corel Draw and laminated it but you can use any of the available templates that are free on-line, print them out on any 81/2 x 11 full size label and then cut them out for use with this yummy recipe.

Please feel free to print out this label for your own use.

Resource

Onion Chopper, Progressive International Onion Chopper (Discontinued by Manufacturer)
Corel Draw, CorelDRAW Graphics Suite X7 Academic


Thank you for stopping by.


Friday, September 5, 2014

BROOKIES

There are a lot of  "Brookie" recipes online and many of them say just use a scoop of brownie mixture and add a scoop of chocolate chip cookie dough and bake.  You can do that and it would probably taste great but would bear little resemblance to the Brookie's from Baked Bakery in Brooklyn which I think is the goal of taking the time to make these yummy treats for family and friends.  With this in mind I will share what I did to make these and provide recipes.

First let's talk baking pan.  I ended up with two different pans.  The Brookie pan from William's Sonoma and the Wilton nonstick 6-cavity mini pie pan. I prefer the Wilton pan because the wells in this pan are more shallow and wider and makes for a more even baking.  They are a similiar price point but I definitely prefer the Wilton and think it has a better chance of being used for other things like individual pies both sweet and savory. The Williams Sonoma pan is called "Brookster" pan and retails for $19.95. The Wilton pan is available on Amazon (is on Prime if you have that, no shipping cost, no tax) and sells for $14.99.

Now for the recipes.

CHOCOLATE CHIP COOKIE

From "Baked" bakery in Brooklyn, NY

Ingredients

1 cup plus 2T AP flour - if using self-rising omit the baking powder & salt
1/2t salt
1/2t baking soda
1/2 cup (1stick) butter, a little soft, but still cold
1/2 cup packed dark brown sugar
1/4 cup granulated sugar
1 large egg
1t vanilla extract
6oz semi-sweet chocolate chips or chunks

In a large bowl whisk together flour, salt and baking soda, set aside.

In the bowl of an electric mixer fitted with the paddle attachment, cream together butter and both sugars until smooth and creamy,  Using a spatula scrape down the side of bowl; add egg and beat until well combined.  Mixture should be light and fluffy.  Add vanilla and beat just incorporate, about 5 seconds.

Add half the flour mixture and beat until just combined, about 15 seconds.  Add remaining flour mixture and beat until just incorporated.  Gently fold in chocolate chips.

Cover and refrigerate three hours.

BROWNIE RECIPE

You can do what I did, get in the car, drive to your local store, purchase two boxes of Betty Crocker brownie mix, add about 1/4 of a cup of good unsweetened cocoa (if you do this you will need to add a tad more water to the mix). Follow instructions and now you have your brownie mix. Nice and easy!

OR

Here is a recipe that I found that is "supposed" to be from "Baked" but I cannot authenticate:


The Baked Brownie, Spiced Up
Adapted from Baked: New Frontiers in Baking and the Baked Bakery in Red Hook, Brooklyn
So, of course the story is even more complicated than this. You see, my friend jotted down the recipe they were using back in the day for the chipotle brownie, so I could try it at home. But I lost it. For three years. And only found it recently, coincidentally, just a couple weeks before someone gave me a copy of the Baked cookbook. Which turned out to have their brownie recipe, improved over the years with more chocolate and more butter (thank you very much) but no chipotle version. And I really had liked that chipotle version.
Below, I have cobbled together the spices from the older recipe with the current one so you can attempt an unofficial version of their very subtly spicy brownies. Not interested in spices? Just skip the chipotle, cardamom and cinnamon. Either way, welcome to your new brownie nirvana.
Yield: 24 brownies
1 1/4 cups (155 grams) all-purpose flour
1 teaspoon (5 grams) table salt
2 tablespoons (10 grams) dark unsweetened cocoa powder
1 to 1 1/2 teaspoons chipotle powder (I didn’t have this and used smoky spicy paprika, with a very similiar flavor profile, instead) (for the spicy version)
3/4 teaspoon cinnamon (for the spicy version)
1/4 teaspoon cardamom (for the spicy version)
11 ounces (310 grams) dark chocolate (60 to 72% cacao), coarsely chopped
1 cup (2 sticks, 8 ounces or 225 grams) unsalted butter, cut into 1-inch pieces
1 teaspoon instant espresso powder
1 1/2 cups (300 grams) granulated sugar
1/2 cup (105 grams) firmly packed light brown sugar
5 large eggs, at room temperature
2 teaspoons (10 ml) pure vanilla extract
Preheat the oven to 350 degrees F. Butter the sides and bottom of a 9 x 13 glass or light-colored metal baking pan.
In a medium bowl, whisk the flour, salt, cocoa powder and spices (chipotle, cinnamon and cardamom), if you’re using them, together.
Put the chocolate, butter, and instant espresso powder in a large bowl and set it over a saucepan of simmering water, stirring occasionally, until the chocolate and butter are completely melted and smooth. Turn off the heat, but keep the bowl over the water and add the sugars. Whisk until completely combined, then remove the bowl from the pan. The mixture should be room temperature.
Add 3 eggs to the chocolate mixture and whisk until combined. Add the remaining eggs and whisk until combined. Add the vanilla and stir until combined. Do not over-beat the batter at this stage or your brownies will be cakey.
Sprinkle the flour mixture over the chocolate mixture. Using a spatula (not a whisk), fold the flour mixture into the chocolate until just a bit of the flour mixture is visible.
Pour the batter into the prepared pan and smooth the top. Bake in the center of the oven for 30 minutes, rotating the pan halfway through the baking time, until a toothpick inserted into the center of the brownies comes out with a few moist crumbs sticking to it. Let the brownies cool completely, then cut them int squares and serve.
Tightly covered with plastic wrap, the brownies keep at room temperature for up to 3 days.

THE MOST IMPORTANT PART OF MAKING THESE AND MAKING THEM COME OUT LOOKING LIKE A BROOKIE AND NOT A MELTED MESS IS TO MAKE SURE YOU DO THE FOLLOWING: 

1. Make the brownie mix (I made 18 Brookies so I made two boxes of brownies) and then put it into a shallow casserole pan, cover with plastic wrap and put into the fridge.

2. Make the cookie dough (once again I doubled the recipe) make two logs of this dough, wrap with wax paper, seal the ends and put into the fridge.

3. When the brownie mix has cooled for a couple of hours take it out of the fridge and and put a scoop of the brownie mixture into each of the six wells in the pan (spray with non-stick spray first) and put back into the fridge to cool some more.

4. After about 45 minutes or so pull the pan out of the fridge, cut off about an inch or so of the cookie dough, very quickly so as not to heat up the dough, roll it around in your hands to make it a little round and gently push into the brownie mixture.

Bake in a 375 degree oven for about 18 minutes, turning the pan half way.  Let them cool a little in the pan and then transfer to a rack.

Sounds complicated but really is not, just takes some time for the cooling, especially if you are making several pans and some patience.

Serve with a scoop of vanilla ice cream.


Wednesday, September 3, 2014

ITALIAN PLUM TORTE

I was at my local farm stand yesterday (to purchase a box of tomatoes to can one more batch) and noticed they had the little Italian plums, just little purple jewels, and I remembered the tort recipe so thought I would give it a try.
This is a simple recipe using only a few ingredients and can be put together very quickly with delicious results.  The only thing you need out of the ordinary is a springform pan.
 Simply wash the plums, slice in half and remove the pits.
Prepared batter into the springform pan and top with the plums and a splash of lemon and a dusting of cinnamon and sugar.
Out of the oven and let it cool.
Ready for a yummy slice, no ice cream or whipped cream required.

Recipe - ItalianPlum Torte

  • 1 cup (125 grams) all-purpose flour
  • 1 teaspoon baking powder
  • 1/2 teaspoon kosher salt
  • 3/4 cup (150 grams) granulated sugar plus 1 to 2 tablespoon
  • 1/2 cup (115 grams or 8 tablespoons) unsalted butter, softened
  • 2 large eggs
  • 8-12 smallish purple Italian purple plums, halved and pitted (or 5-6 larger plums)
  • 2 teaspoons fresh lemon juice
  • 1 teaspoon ground cinnamon
Heat over to 350°F. Whisk together flour, baking powder and salt in a medium bowl. In a larger bowl, cream butter and sugar together with an electric mixer until fluffy and light in color. Add the eggs, one at a time,  scraping down the bowl after each addition. Add the dry ingredients, mix until just combined.

Spread batter into an 9-inch springform pan (spray with cooking spray) and smooth the top. Arrange the plums, skin side up, all over the batter, covering it. Sprinkle the top with lemon juice, then a mixture of the cinnamon and remaining sugar.*

Bake until cake is golden and a toothpick inserted into a center part of the cake comes out free of batter, about 45 to 50 minutes. Cool on rack for a few hours before serving.

*after the lemon is squeezed onto the torte I use a little hand-held strainer and dust the top with the cinnamon-sugar mixture.

This is so good and so easy and I think is one of those things that could be served for breakfast, as a snack or a lovely dessert. I am in the process of lining my picnic basket and I think that this is not a fragile dessert and would be great for the picnic basket too. I might like to try this with cranberries when we start getting fresh ones - will let you know how that turns out for me.

Resources

Recipe source, adapted from a recipe by Marian Burros from the NY Times via Lottie + Doof
 Cake Stand, HomeGoods

Thank you for stopping by.
  

Monday, September 1, 2014

FRESH PEACH AND PLUM GALETTES

The Alzheimer's Idaho (local grass-roots organization) The support group dinner is normally the last Friday of the month but this month it was last Saturday.  If you follow this blog you know that I am a volunteer for this wonderful organization and one of the things I do is to make their dessert each month.


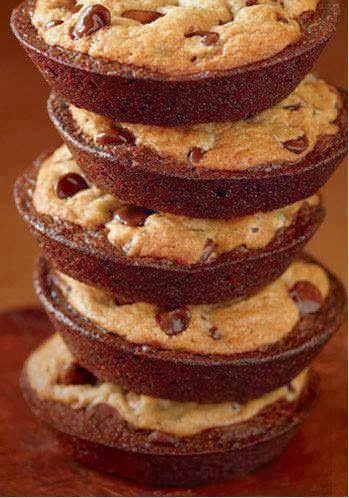
Since the late summer is yielding so many wonderful stone fruits at their peak, I decided that a galette (or crostata) would be perfect for the monthly dessert. A galette is a tart with hand folded edges of pastry.  There are endless variations of sweet and savory fillings.  The galette is French while the crostata is Italian.  They can be made with different layers and I chose to make sweet cream cheese galettes with fresh stone fruit - peaches and plums.  The first thing I did was go to my local produce place and see what was the freshest available on baking day.  I was hoping to find Santa Rosa plums (I have a particular affinity for this variety as I grew up with them and my father grew them commercially) but found out "soon." They suggested Simka plums and Red Globe peaches, they were both at their peak, ripened on the tree and delicious - always trust a farmer! You will note that I made (3) galettes - every month I make the dessert and my house fills with the aroma of yummy dessert and then I whisk it away and give it away so this month I decided to make one to keep at home and make the hubby happy - ours was the peach and plum one.
These desserts are great for anyone with a pie dough phobia as you can use dough that you purchase.  I will give you the recipe that I use but if you don't have the time or the inclination to make your own dough use a box mix or one from the refrigeration area of your grocery store.  If you are lucky enough to have a Trader Joe's in your area they have one I have used before in their freezer section.
The first thing I would do is to prepare my pie dough, make it into disks and put into the fridge.
 Next the sweet cream cheese filling, just a few simple ingredients, I use my stand mixer to make this and it is a very quick process.
After rolling out the dough in a circle (or the best you can do), make a circle of the sweet cream cheese filling. A trick that I use is to make the galette on the Silpat mat and then gently put that onto the cookie sheet for baking.
Add your fruit, I like to start on the outside and work in but you can do it anyway you want - personal preference.
 
Gently fold over your crust and brush with the egg white and sprinkle with sugar (I like to use the more coarse textured sugar), ready for the oven.
After the galette cools I like to brush the fruit with a mixture of apricot preserves and water that I have brought to a boil and combined to make it more syrup like and have found that my hubby's BBQ brush is the perfect thing to brush the fruit with, better than a pastry brush that tends to pull at the fruit a little, the BBQ brush does not do that.

Ready for a two tier display rack and a little sign telling them what's for dessert.  The sign is necessary as I drop off the dessert, the hostess does not make it or have any idea what I am making, so the sign tells the story. Another trick that I use is when transferring the galette from the Silpat mat slip a cardboard cake round under the galette (after using a spatula to loosed it all around) and you can make the transfer with the galette staying perfectly intact.
 As usual moseyed over to The Graphic's Fairy and found a nice graphic, then in Corel Draw put it together with a dotted back ground and printed it out on 8 1/2 x 11 cardstock then carefully cut out the top part, folded it over, used a bone folder to get a crisp top and trimmed all around.

I recently found out that one of the members of the group cannot have dairy or chocolate so she has not been having dessert. I found this Melt buttery spread that is dairy free. In a sauce pan I melted some of the Melt with some brown sugar and some oats then set aside while I stewed some of the peaches and plums, a little of the leftover apricot preserve syrup and some port wine (fruit loves port ). Added the fruit to a heatproof bowl, topped with the crumble and baked for about 20 minutes in a 325° degree oven. The Honey Melt is wonderful and I look forward to making other desserts for the non-dairy attendee and trying some of their other products.  I am placing a link below to their website. 

A thought or two on pie crust and lard.  When I was growing up the school pot luck was a great place for some good home cooked food.  At every school there was that mother who was the famous pie maker and we all wanted her pie, the one with the crust so flaky it would melt in your mouth.  Turns out Ms. PTA pie maker was using LARD, you know that word that strikes fear in the heart of all healthy eating people, the word that is equated with obesity and sure death.  Now it seems that the food world is rethinking lard and it's health effects.  I make no recommendation one way or the other but I do know that the best pie crust I have ever eaten contained some lard. Back in the day when my boys were little I found a book at the Jackson, California library called Wyoming Wife, Rodello Hunter's book about her coming to Wyoming (I think from back east) as a young bride.  At the end of the book were recipes that had been given to her by the wonderful women of Wyoming.  I could not get to the store fast enough to buy lard and make wonderful pie crust. But then I kept reading all the bad things about lard and did not want to poison my family.  Will be interesting to see what science today says about lard - an ingredient that has been used in cooking as long as there have been pigs. Leaf lard is the finest lard (won't even say what part of the pig that it comes from), it is expensive and hard to find but can be ordered online.  Would love to hear your comments about this subject.

Pie Crust recipe courtesy of Jacques PĂ©pin  

  1. 1 1/2 cups all-purpose flour
  2. 1 1/2 teaspoons sugar
  3. 1/4 teaspoon salt
  4. 1 stick plus 2 tablespoons cold unsalted butter, cut into small pieces
  5. 1/3 cup ice water
  • In a food processor, combine the flour with the sugar, salt and butter and process for about 5 seconds. Sprinkle the ice water over the flour mixture and process until the pastry just begins to come together, about 10 seconds; you should still be able to see small pieces of butter in it. Transfer the pastry to a work surface, gather it together and pat into a disk. Wrap the pastry in plastic or wax paper and refrigerate until chilled. (You can also roll out the pastry and use it right away.) 

Galette Recipe

1 package (8 ounces) cream cheese, softened
½ cup confectioners’ sugar
3 Tbs. cornstarch, divided
1 whole egg, separated
2 Tbs. sugar, plus a little extra for sprinkling
1 tsp. vanilla extract or ¼ teaspoon almond extract
1 single pie crust, homemade or store bought
2 cups fruit (pick 1 or mix thinly sliced plums, peeled peaches and apricots; or mixed berries, such as blackberries, blueberries and raspberries)

Apricot preserves and water cooked until syrup like for brushing on the fruit - do not have to do this step but I like the way the fruit looks - again, personal preference.

*Adjust oven rack to lowest position and heat oven to 400 degrees.

Mix cream cheese, confectioner’ sugar, 2 tablespoons of the cornstarch, and the egg yolk in medium bowl. In a separate medium bowl mix fruit, 2 tablespoons of sugar, remaining tablespoon of cornstarch, and vanilla or almond extract.
Unfurl pie dough on a lightly floured surface and roll to about 13-inches in diameter. Slide onto a cookie sheet or pizza pan and spread evenly with cream cheese mixture, leaving a 2-inch border. Scatter fruit evenly over cream cheese mixture. Fold pastry border over the fruit. Brush dough perimeter with egg white and sprinkle with a little sugar.
Bake galette until golden brown and bubbly, about 30 minutes. Loosen with a metal spatula and slide onto a wire rack to cool slightly. After the galette has cooled brush with the apricot/water syrup and let it sit a bit before serving. Serve warm or cold, always good.

*This is VERY important, if you try and bake the galette at mid-oven the sides will get done and the bottom will not be done. 

Serves 6

Cooks Note: If my fruit is very ripe and I don't want to disturb it by mixing it all together with the sugar/cornstarch/vanilla or almond extract mixture I omit the vanilla/almond mixture and mix together the sugar and the cornstarch and using a little hand sifter, after I have placed the fruit on the galette, just dust it with the sugar/cornstarch.

Resource

Recipe for pie dough Jacques PĂ©pin  
Two tiered stand, HomeGoods
Cardboard cake rounds, Wilton
Melt, non-dairy buttery spread website, link
Eiffel Tower image, The Graphic's Fairy, Link

Thank you for stopping by.