Monday, April 3, 2017

EASTER TABLESCAPE


A couple of months ago a dear reader in Florida inquired about an Easter tablescape and I told her I would do my table early and do a post, so here is my table for this Easter.  I always set my table a day or two earlier as I don't want to realize at the last minute that I cannot find something, somethings is broken, etc.  I also want to wash the dishes and glasses as many times they are in the storage in the garage and the good glasses have been in the cupboard but are dusty.  Once everything is washed I will set the table a day ahead and cover with a sheet.  It is so nice on the day of the event to not have to worry about the table.  The other thing that I do is to have a copy of my dinner menu printed - this not only helps with grocery lists but gets rid of the OMG, I forgot to put the rolls in the oven!

The menu has varied a bit this year because of some special dietary needs of the family but I value the health and welfare of the family above all else and see these changes as a challenge to make a tasty dinner in spite of some demanding changes.

On to the tablescape.....
I just start layering. I have never gotten around to ordering a pad for this table (truth be told I don't want to store the pad) so I put a plain cream colored tablecloth on first and then the pink and white buffalo plaid cloth.
Next I added a little Battenburg mat, chose my chargers, centerpiece and little side candles. I then did what I call a "light check," and that is to light the candles, to make sure that everything works and it looks OK.
I had these small votives in first and they did not work - they did not give off enough glow for the little metal cups.
For the metal egg stand I used those little battery lights and they are so easy to hide in the excelsior and the paper flowers. I love these and they were marked down to $5 after Christmas and they have an automatic turn off switch if you forget to turn them off and the batteries last for a very long time.
These short, fat candles work perfectly.
Time for the napkin rings - I tried some bunny ear ones made from burlap and they were just a little too country for this table so I pulled out these silver plated spoon napkin rings. Very simple to clean these and make them shine - just have some warm soapy water in your sink and drop these one at a time in silver jewelry cleaner and count to about 7 seconds pull out and put in the warm soapy water, rinse with clear water and wipe dry with a soft cloth.

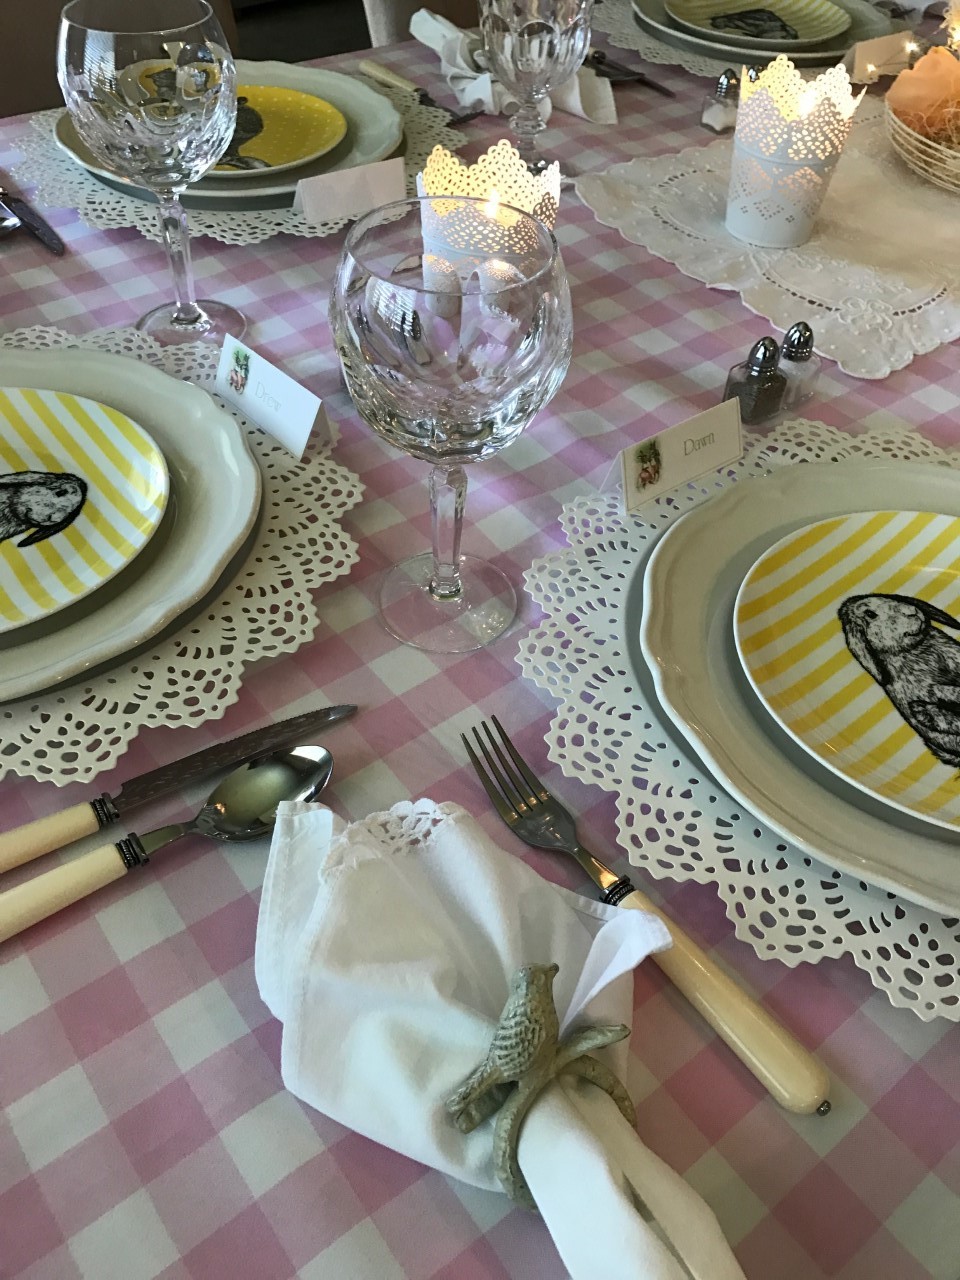
I selected a simple, white napkin with just a little lace accent.
After putting the silver napkin rings on the table I was not happy and pulled out these cute birds - they worked much better.
I had some cute bunny plates for the kids in the group (after Easter treasure from Pottery Barn kids) and was going to just use the salad plates that go with this off-white pottery but found these cute bunny plates the other day and they were very reasonable and I love them.  Using my crystal water goblets for adults and smaller glasses for the kids. I have other crystal but tend to use these all the time for a couple of reasons - 1) I love the thumbprint pattern and 2) they are dishwasher safe and in my book that is a big plus when you have company and want to get those dishes done after your guests go home. I chose some off white flatware for the table.
Found a cute Easter graphic and made the place cards.
The only special items you need to make the place cards is some cardstock paper and to get a nice crisp edge when you fold the paper over a bone folder works great.
Now time to take apart and wash everything (not the napkins they are just washed and ironed) and put the table together later. On Easter day I will also have some fresh tulips on the table in between the little candles.

Resource

Individual salt and pepper shakers, Restoration Hardware
Kids bunny plates, Pottery Barn Kids
Yellow striped Fluffkins plates, TJ Maxx
Pink and white buffalo check gingham cloth, Amazon
Battenburg napkins & runner, Marshall's
Crystal water goblets, Villeroy & Boch, Bernadotte pattern
Bird napkin rings, from The Garden Gallery, Morro Bay, CA
Chargers, fat candle holders, fat candles, dinner plates and dessert plates (not shown) all from IKEA and we do not have an IKEA here either but remember they ship! 
French wire egg stand, Martha by Mail but you can find these at craft and decorating shops, etc. and often they are not painted but is simple to spray paint them if you prefer that look.

Thank you for stopping by.


Friday, March 31, 2017

NEW DRESSING AREA ARRANGEMENT


We recently did an upgrade to a existing bath and so to coordinate the bath with the powder room area we changed out the back splash which changed the color scheme.  I had purchased a $5 old, ugly (I am sure my friend who was with me had doubts about my taste for purchasing this ugly thing) large candle stick and had no plans for it but knew it would come in handy at some point so I used it for this fun and easy project.
1978 called and wants their candlestick back! This is the original look.
First coat I used Folk Art Metallic Sterling Silver - one coat of this will not cover but will give a silver sheen to the object.
Ready to start the leafing over the cadlestick.
Do not be afraid of using leaf products as you cannot go wrong. These products come in all metal colors and are great to use on metal, wood, etc.  I especially love the look on old picture frames.  Follow the directions on the package and you can put on as little or as much as you would like on your project.
The sheets are very thin and you put a sticky coat on the object and then place the sheet on and use the brush to attach it to the project and if you keep swiping with the brush you will take more off or leave on - just decide what look you like.
Once the leafing was done I attached a square of floral foam to the top.  I used a little glue to attach but you could also use florist tape or florist clay to attach.  Let the glue dry and you are ready to attach your flowers, etc.
I chose to use 8 stems from my hobby store.  First I removed all the flowers (please use needle nose pliers to remove the stems which are wired). Even tho you see these leaves in my garbage I did pull them out and put them in my bag of greenery for use in a later project - I had cut the flowers off these stems but did not want to use the leaves.
Here it is midway - be sure that you have enough greenery to fill in the holes.  You could also cover the floral block with some moss.
A word about the beautiful ribbon I used. d. stevens ribbon is my favorite brand but can be hard to find and pricey so I look for it on sale. Designers will carry as well as higher end stores.
I was with my dear DIL at Nell Hill's in Atchison, Kansas when I spotted this stripped ribbon and when I saw it I knew I would buy - had no idea when I would use but as soon as I saw it I thought of Audrey Hepburn in My Fair Lady.

Here is the finished product in the dressing room!
Since I have decorated for Easter I brought out this old favorite bunny and voila I am finished with this fun and easy project. So....using a $5 find and a few stems (on sale 1/2 off) some florist foam, paint, ribbon, and leafing you have a lovely creation at a fraction of the cost of one from the store.

Resource

Leafing, Hobby Lobby, Michael's and other hobby stores. Amazon Link
Candlestick, 2nd hand stores, charity stores, etc.
Greenery and flowers, Hobby Lobby, Michael's, etc.
d. stevens ribbon, Link
Floral foam, Hobby Lobby, Michaels, and other hobby stores
Bunny, TJ Maxx

Thank you for stopping by.

Wednesday, March 15, 2017

FULL CIRCLE FRIENDSHIP DINNER

I feel so blessed to have wonderful new and old friends and neighbors.  Recently I found out my dear neighbor next door was having a medical procedure so I thought it would be nice to fill a basket with dinner for her. This post is a testament to friendship that has come full circle - if that makes sense? One friend gave me a beautiful loaf of Panettone for Christmas (from a wonderful artisanal bakery in Amador City, CA, I will provide a link in resources later), another friend gave me a jar of the best lemon curd I have ever had (this is an Idaho product, information in resources too) and I combined the two to make lemon bread pudding to pass on to my dear neighbor for the dessert in her dinner basket. We had delish French toast with about half of the Panettone and I put the rest in the freezer. We had tried some of the yummy lemon curd on some scones but had most of the jar left to use in the pudding.
This is a recipe from King Arthur flour and is easy and delicious.  If you read this blog you will know I often mention that King Arthur is the only flour I use (except for wonderful Wondra). At one time it could be hard to find but not anymore - all the stores in my area carry their flour including the ubiquitous Walmart.  I love their self-rising flour, especially for biscuits, but it is harder to find.  However, once in a while they will have free shipping - woohoo, and that is when I load up and try things I might not want to pay shipping on but when it is free....! I will also add information for Mactaggart's Brand products - another Idaho company who makes simply the best products ever - they ship! Of course information in resources later.
Really a simple recipe - nothing hard here and the result is so good.  Whisk together the eggs,half & half, sugar, vanilla and Fiori - a word about Fiori di Sicillia - literally means "Flowers of Sicily" and is used as a flavoring.  It has this delicious citrus flavor and is sold in specialty stores, King Arthur sells.  I have theirs and I also have Mactaggart's Brand and I must confess that Mactaggart's Vanilla Fiori di Sicillia is just the best and once I tried, it is the one I use, it just adds a beautiful flavor - add it to a plain vanilla cupcake when it calls for vanilla and the cupcake is so elevated with an additional flavor profile.

Soak the cubed Panettone. You can find Panettone all year round in specialty stores and online but it will not be like the Panettone I had so if you try this you might want to add some toasted, slivered almonds.  I think this is such a good pudding recipe that even store bought Panettone will still be good.
Half in the pan...
Time to spread the lemon curd.  Thanks to my dear friend Debby (or as hubby affectionately calls her "Debby with a Y.") I now know tht Sticky Fingers Bakeries lemon curd is actually made here in Boise by Dorothy's and labeled Sticky Fingers Bakeries.  We took a field trip to where the items are manufactured and it is really an Idaho thing - fun to go and shop there and find more of her delicious jams, jellies, etc.  I recently purchased a large container of sourdough pancake and waffle mix Dorothy makes - no starter needed.  I am so eager to try as thanks to my dear, late father-in-law I love sourdough waffles but always forget about the starter and it ends up this flat, stinky thing in the back of the fridge.
The rest of the bread mixture....
Sprinkle the top with a little sanding sugar and ready for the oven...
Makes a big heavy loaf - I shared most with my neighbor but kept some for us and hubby who loves bread pudding was a little apprehensive about the addition of lemon curd but in the end loves this dish.
So into a good size gift bag with some homemade soup and rolls and our favorite butter, the pudding and some of Magner's hard apple cider.  At least she did not have to cook dinner.

Panettone Lemon Curd Bread Pudding Recipe:

Ingredients:
  • 3 large eggs
  • 2 cups half & half (fat-free is fine), light cream, whole milk, or a combination of milk and cream
  • 1/4 cup granulated sugar
  • 1 Tablespoon vanilla extract
  • 1/4 to 1/2 teaspoon Fiori di Sicilia, to taste; optional
  • 9 to 10 cups diced (generous 1" cubes) panettone or other bread
  • a generous 1/2 cup prepared lemon curd, for filling
  • coarse sanding, for sprinkling on top; optional
  • Instructions
    1.     Whisk together the eggs, half & half, sugar, vanilla, and Fiori.
    2.   Put the cubed bread in a bowl, and pour the egg mixture over it. Stir to combine. Set the mixture aside for 30 to 60 minutes, so the bread can absorb much of the liquid.
    3.   While the bread is soaking, preheat the oven to 350°F. Lightly grease a 9" x 5" loaf pan.
    4.   Stir the bread again, then spoon half of it into the prepared pan.
    5.    Dollop the lemon curd over the bread/custard. Spread it out if it's not too sticky; though leaving it in clumps is fine, too, as it'll melt a bit and redistribute itself as the pudding bakes.
    6.   Top with the remaining bread/custard, patting it down gently.
    7.    Sprinkle with coarse white sparkling sugar, if desired; this creates a crunchy/sweet topping that plays well with the pudding's smooth interior.
    8.   Bake the pudding for 40 to 50 minutes, until it's golden brown. Remove it from the oven, and let it rest at room temperature for at least 30 minutes, in order to set, before slicing and serving.
    9.   Sift confectioners' sugar over the top of each slice; serve with a bit of whipped cream or ice cream, if desired.
                       Yield: 8 to 10 servings.

Resource

Recipe: Adapted from King Arthur Flour
Mactaggart's Brand Products: Link
Dorothy's Products: Link
Andrae's Bakery, Amador City, CA: Link


Thank you for stopping by!