Wednesday, October 8, 2014

SPANISH TORTILLA

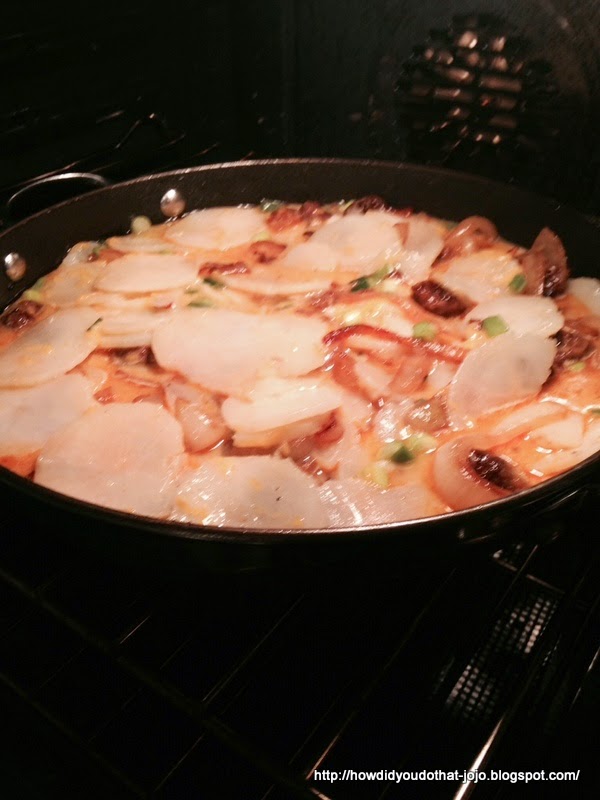
Spanish tortilla (not to be confused with Mexican tortillas)  is a classic Spanish dish sometimes with meat and sometimes without.  Served as a main dish or cut into pieces and served as a tapas.  I am working very hard to serve high-protein meals to my recuperating hubby (protein, the building block of all cells!) decided to give it a try for dinner. So I thought this dish might break the monotony of just a meat dish.


 Simple ingredients - garlic, green onions, milk, eggs, potatoes, sweet onion, EVOO, and cheese.  The only ingredient out of the ordinary is sliced dry chorizo or salami. Hubby not a fan of dried salami so decided I would use fresh chorizo and just slice it and pre-cook.
 This is a one pan dish. Slice the chorizo and brown/cook in the skillet.
Potatoes are sliced thin and boiled and set aside.
Chorizo removed from pan, onions added and cooked to caramelize them.
Chorizo back in the pan along with the garlic and stir to cook the garlic. Then in a big bowl this mixture gets gently folded into the potatoes and the mixture of the eggs, green onions and cheese.
Back into the frying pan (I wiped out the pan and sprayed it good with Pam) you will invert the cooked Spanish Tortilla onto a serving dish to serve.

Before I give the recipe I want to make a couple of notes. If you love chorizo you will love this - my substitution of the fresh vs the dry was for two reasons - my store did not have the dry and the fresh had more protein. I really think to make this authentic you need the dry chorizo.  The patient loved the flavor of the meat in the dish but did not eat the meat.  I will make this again soon but think I will be making the meatless version.  Will  add two more eggs to make up for the elimination of the meat.  There are a lot of recipes for this dish but many of them say to fry the potatoes - I particularly like this recipe because you simply peel, slice (used the mandoline) cook until fork tender and set aside - no use of any oil.

I served this with a green salad and corn.

Recipe

2 pounds russet potatoes, peeled and thinly sliced
2 tablespoons olive oil
1 medium sweet onion, thinly sliced
Kosher salt and freshly cracked black pepper
1/4 pound dry Spanish chorizo or sliced fresh chorizo
2 cloves garlic, minced
6 eggs
2/3 cup milk
3 green onions, chopped
1 cup shredded Cheddar

Preheat the oven to 350 degrees F.

Bring a large pot of water to a boil over medium heat. Add the potato slices and cook until they are just tender. Drain and reserve.

Meanwhile, in a medium nonstick saute pan, heat the olive oil and add the onions. Season with salt and black pepper, to taste, and cook the onions until they are soft and starting to caramelize, about 5 minutes. Drop in the sliced chorizo and the garlic and cook until the sausage starts to brown. Remove the pan from heat.

In a large bowl, beat the eggs until they are light yellow in color. Stir in the milk, green onions, and Cheddar and combine until incorporated. Adjust the seasonings with salt and black pepper. Add the chorizo mixture and potatoes to the bowl and stir gently. Return the entire mixture back to the saute pan. Put the pan in the oven and bake until the eggs set, about 15 minutes. Remove from the oven and let the tortilla rest in the pan 10 minutes before inverting it. Using a large clean plate as an aid, flip the tortilla over and slide it out onto a large cutting board. Slice the tortilla into wedges and arrange on serving dishes. Serve it warm or at room temperature.
 
Resource
 
Recipe modified from Melissa D'Arabian, Food Network
 

Monday, October 6, 2014

PAPER PROJECT - SPECIAL BIRTHDAY INVITATION


I am fortunate to live by three of my five grandchildren so when their birthdays come around we like to spend a little alone birthday time with them and I like to make a special invitation for that occasion.
First I gathered some supplies:

Ribbon
Narrow duct tape
Large pom-poms
Silver pipe-cleaners
Paper mache/Kraft ball, 2 1/4"
Paper mache/Kraft box, 2 1/2 x 4 1/4
Hot glue
Decoupage
Full Sheet Label
Cardstock
Handmade crepe fringe
Sheet music graphic
Glitter numbers
First thing I did was mosey over to The Graphic's Fairy and get this vintage French sheet music post card, brought it into Picasa and changed the color to black & white. Enlarged the graphic and printed it out on a full sheet label.
Once printed out on the label just cut the label the width of the box, peel off the back and adhere to the box.
Using the lid as a guide cut out a circle and adhere to the box top and finish off the edge with the checked narrow duct tape.
The paper mache/Kraft ball is painted with any type of craft paint, once dried ready to apply the photo.
Print out a full face photo on regular printer paper and adhere with a decoupage medium. Press out any bubbles and or creases that you can- some will remain because of the ball shape, let it dry and give it a top coat of the decoupage medium.
Glue the paper mache/Kraft ball to the top of the box with hot glue.  Once the glue is dry you can then add whatever you like to decorate - I chose some crepe fringe, ribbon and finally some silver pipe-cleaners. Don't worry about a few creases as the hat will cover most of them.
 To finish add a simple cone hat made of cardstock, some of the fringe to finish off the hat, the large pom-pom glued to the top and finally the black glitter age number with the explanation point!!
View from the back - there was a little opening in the paper so I just glued a couple more of the pom-poms to finish off the box.
To make the invitation I simply typed out what I wanted to say, printed it out, trimmed and glued to a leftover scrap of the music paper that was printed out on the label so I just peeled off the back and adhered it to some cardstock. Just make sure that it is not too big to fit into the box.
Finally some food grade tissue, some homemade cookies, ready to fold over the tissue, set the invitation on top and close the lid and deliver to this sweet boy.

Resources

Ribbon, Bazzill Basics, 7/8", black and white
Narrow duct tape, Big Lots
Large pom-poms, craft store
Silver pipe-cleaners, craft and $ store
Paper mache/Kraft ball, craft store
Paper mache/Kraft box, craft store
Hot glue, craft, hardware stores
Decoupage, Annie Sloan, specialty stores and online
Full Sheet Label, Avery Labels
Cardstock, Craft and paper stores
Handmade crepe fringe, Etsy seller, Link
Sheet music graphic, The Graphic's Fairy, Link
Glitter numbers, craft stores
Cookie recipe, see post, Saturday, October 4, 2014

Thank you for stopping by.

Saturday, October 4, 2014

BISCOFF GINGERBREAD COOKIES, TWO WAYS

Hubby's surgery was a big success and now it's time for me to get busy with those projects and blog posts that had to wait whilst I was Flo Nightingale. Thank you to everyone who sent get well's.

I know it is still very hot in the Southwest, California and other places but fall is in the air here in Eagle, Idaho. A high today of 70 and it is starting to feel nice and crisp in the mornings and evenings.  This cookie is a great fall treat and a wonderful gift at Christmastime.

This recipe is so darned good and the unfilled cookie is one of my favorites to have with a cup of tea.  I prefer it to the filled but I made these today as a gift and I know my recipient will prefer the filled cookie.

The cookies are a little different to put together than other recipes but are worth the effort - not hard just different.  Firstly the one ingredient that you cannot substitute is the Biscoff spread - unless you were to use Speculoos spread from Trader Joe's.  If you have not seen or used this product it is a spread made from cookies - spreadable cookies!  Biscoff is easy to find, I found at my local grocers and Walmart carries this product.  At first it only came in the simple spread but I note that now you can get chunky, etc. In this recipe please use the plain cookie spread.
As usual, gather your ingredients.
Because ground ginger tends to clump, I always use a little mortar & pestle and take out all the lumps, if you don't have one put the ginger in a plastic bag and roll over it with your rolling pin.  You just do not want to get a lump of ginger in a little bite of cookie.
 These cookies must be rolled out in between sheets of parchment.
After rolling out, I like to place on top of a cooling rack to set into the fridge to cool for the two hours.
These look a little anemic to me as they usually are darker but because I did not have enough molasses I chose to use dark corn syrup.  They are still yummy but not as good and as I mentioned when you use molasses (as called for in the recipe) the cookie has a richer, more gingerbready look.
Four ingredients for the filling.  I adjust the recipe and add about 1/4 tsp more of the vanilla and 1/4 more cup of the marshmallow creme.
I find it much easier and not so sticky to fill a pastry bag and using a large tip just dot a cookie with the filling and put on the lid and give a little push you are finished.

Cooks notes: As mentioned do not substitute for the cookie spread, it is very important to chill the dough as the recipe advises. The yield given on the recipe is 24-30 and I always get 48 cookies and more if you take the time to put the scraps into a ball, chill them again, roll out and bake. 
 And here we are.....a little box of yum to share.

BISCOFF GINGERBREAD SANDWICH COOKIES WITH MARSHMALLOW FILLING - Yield 24-30 cookies

1/2 cup butter, softened
1/2 creamy Biscoff spread
3/4 cup firmly packed light brown sugar
1 large egg
2 tablespoons molasses
1 tablespoon vanilla extract
2 cups AP flour
1/4 cup cornstarch
2 teaspoons ground ginger
1/2 teaspoon ground cinnamon
1/2 teaspoon ground cloves
1/2 teaspoon ground allspice
1/2 teaspoon salt

In your mixer bowl beat the butter and the Biscoff spread until smooth and creamy, about 2 minutes.  Add brown sugar, beat until light and fluffy, about 3 minutes. Add egg and beat well. Add molasses and vanilla extract and beat to combine.

In a medium bowl whisk together the flour, cornstarch, ginger, cinnamon, cloves, allspice and salt. With the mixer on low speed gently add the flour mixture to the butter mixture until it forms a dough.

Divide the dough in half.  Roll each half between two pieces of parchment (see photo) to 1/4 inch thickness.  Put in fridge for two hours.

Preheat oven to 350°. Either line the baking sheet with parchment or do as I do and use a Silpat mat. Using a fluted 2 1/4" cookie cutter cut out the cookies and put on the mat/sheet.  As I mentioned my yield is higher than this recipe states - I put 24 cookies on each sheet. Bake for 12 minutes. Let cool and fill cookies.

MARSHMALLOW FILLING
1/2 cup marshmallow creme - I use 3/4
1/4 cup vegetable shortening
1 teaspoon of vanilla - I add an additional 1/4 tsp
3/4 cups confectioners' sugar, sifted

In your mixing bowl at medium speed beat the marshmallow creme and shortening until smooth and creamy, you will have to use a rubber spatula to wipe down the sides. Add the vanilla extract and beat, then gently add the confectioners' sugar and whip until completely combined.

Either use a tablespoon and drop on the cookie bottom and add the top and let them set for awhile or I prefer the much easier and less sticky way of using a piping bag and a large tip.

Resource

Cookie and filling recipe adapted from Victoria Magazine
Treat box, Meri Meri at specialty stores and online
Large tip for piping bag #9
Plate, Burleigh England, Danish Fern

Thank you for stopping by.