Wednesday, April 29, 2015

BLACK & YELLOW TABLESCAPE - PILAF RECIPE


This blog post goes with Monday's Portuguese chicken dinner - a black and white with yellow accent tablescape and Armenian pilaf, green beans and salad rounded off the menu.
Good homemade pilaf is very easy and just takes a few ingredients.  Some cooks will add golden raisins and or pine nuts - I like to add pine nuts to mine.  I just love the flavor.  The other ingredients are just long grain white rice, chicken broth (use homemade if you have it on hand) salt, pepper, butter and broken up pasta - preferably angel hair but as you see I used vermicelli nests, about three of them.
Pour the rice and the broken pasta into a medium heated pan and stir until the pasta and the rice are brown in color...if you are using pine nuts add them towards the end and stir them into the rice/pasta mix.  I like to gently brown the pine nuts in the oven first - careful they burn more easily than other nuts.
 Nice and brown and ready for chicken broth.....
Once cooked you end up with nice fluffy, perfectly done rice with pasta and pine nuts.
I decided to do the tablescape with things I love - black and white with yellow and a little red accents....cute black polka dot chicken napkin rings.....
I love my little white chicken, he looks so fresh but he needs a boost on the table - today he is sitting on an overturned ceramic votive holder....
White polka dot chicken napkin holder...pretty yellow snack/dessert plates......
Fun find at Big Lots - adorable votive lanterns that I thought would be cute with some artificial orchids and other greenery......

Recipe for Armenian Pilaf

1/4 cup of butter
1/2 cup of broken pasta (vermicelli, angel hair, etc.)
1 cup long grained regular rice (not parboiled)
2 cups of good chicken broth - preferably homemade
1/2 tsp salt
1/4 tsp pepper
1/4 cup lightly toasted pine nuts

In a saucepan (with a well fitting lid) over medium heat melt the butter (turn down the heat if it starts to darken), add the rice and the pasta and stir to brown, then add the pine nuts and stir a little more, add the salt, pepper and the chicken broth.

Bring this to a boil, then turn down to a good simmer and place the lid and DO NOT LIFT THE LID for 20 minutes, check and if the rice is not done let it cook for another 5 minutes. When it is done let it "rest" for five minutes then fluff with a fork and serve.  Do not boil this when cooking - the cooking liquid will be gone and the rice will not be done and adding too much additional liquid will make the rice mushy.

Enjoy!

Resource

White Ceramic Chicken, Marshall's
Yellow Votive Lanterns, Big Lots
Silk flowers and greenery, Hobby Lobby
Napkins, made by me
White votive holders, HomeGoods
Crystal, Villeroy & Boch, Bernadotte pattern
Chicken napkin rings,DII Napkin Rings Set of 4, Hen
Black Plates, Big Lots
Cream Salad Plates, IKEA


Monday, April 27, 2015

PORTUGUESE CHICKEN

Portuguese chicken is a favorite at our house.  It is great roasted in the oven or on the grill - it is moist, tender, yummy and spicy all at once.  Because you butterfly a whole chicken it cooks evenly.
The first thing to do is to get a good quality whole chicken - I happen to love these chickens from Trader Joe's.
It is really easy to butterfly the chicken - the most important thing is to have a sharp knife and sharp shears.  After washing and patting dry the chicken, turn it over and using the tail as a guide  you can see where to cut out the backbone.
Once the backbone is cut out just turn the chicken over and you can see the breast/keel bone, using the knife slice it open and you can cut around and remove the bone.
Now you have this beautiful, butterflied whole chicken.  Trim off any excess skin, etc.  I also like to cut out the rib bones when I cut out the breast bone.  It's that easy - a couple of cuts and now the chicken is ready for the marinade and you can either cook on the grill or in the oven.
I like to place my chicken on a rack over a Silpat mat on a cookie sheet.  Brush the marinade on both sides and place in a 425 ° hot oven.

Here is a link to a YouTube video showing how to butterfly the chicken:  https://www.youtube.com/watch?v=Z8eNzNMMuKc 

Roast the chicken for approximately 45 minutes - turn once and baste the back, then turn again and baste the top for the last few minutes.  You will need to take the chicken out of the oven and be careful when you turn to baste. As I mentioned one of the best things about this chicken whether you are roasting in the oven or cooking on the BBQ is that by butterflying the chicken it cooks evenly.
Here it is rested and ready to be served with pilaf, green beans and salad.

Portuguese Chicken Recipe

1 Medium to large whole chicken

Marinade

4 Tablespoons Lemon Juice
5 Tablespoons Olive Oil
1/4 cup red wine vinegar
 1 1/2 tsp cayenne pepper
1 tsp Jerk seasoning
1 tablespoon minced garlic
1 1/2 tsp hot paprika
1 tsp smoked paprika
1 tsp salt
4 packages sweet n' low

Combine all ingredients in a bowl and whisk to combine and using a pastry brush, brush both sides of the chicken, place in the oven and brush again after a few minutes, then take out of the oven and turn over and brush the back and let cook for a little more and then remove again and brush on the top one final time.  Because it is such a hot oven this will be done in 40-45 minutes, depending on your oven and the size of the chicken.

Cooks Notes:  Most recipes for this chicken (called Piri Piri, I think) will call for red pepper flakes so I have tweaked this recipe and eliminated the flakes but added the hot paprika - some recipes call for corriander which I don't use but I added the Jerk seasoning just because I like the flavor and I added the sweetner because I think it balances the vinegar. As I have said before - unless it is baking, most recipes are a "suggestion" to me.

Thank you for stopping by.
 

Saturday, April 25, 2015

"MILKSHAKE CUPCAKES" FOR ALZHEIMER'S IDAHO

If you follow this blog you will know that I volunteer for Alzheimer's Idaho - a local grassroots organization. One of the things I do is to make dessert for their monthly support meeting.  Last night's dessert was a tray of "Milkshake" cupcakes.  As these are strawberry-sour cream cupcakes topped with chocolate ganache and then with fiori di sicilia buttercream no ice cream was necessary.
Gather together all ingredients...
One of the things I think gives a boxed cake mix a better result is to sift the box ingredients - in this case this was a strawberry cake mix so once the flour ingredients were sifted into the bowl what was remaining were little bits of the red strawberry flavoring - just dump them into the mix as they will not go through the sieve.
After adding the other ingredients you have a nice, thick batter to divide evenly between the cups....
Set the cupcake cups into the muffin tins and bake and then let them cool completely....
The hot cream and butter poured over the chocolate chips...
Lots of whisking and you have a beautiful, shiny chocolate ganache....
Divide the ganache evenly over the cooled cupcakes...
Once the ganache has completely cooled assemble the jimmies, the Sixlets, cut straws and your frosting.  Because the frosting will harden once applied to the cupcake I choose to do one cupcake at a time to be sure the Jimmies would stick to the frosting.
A nice little rich cup of goodness!

Cupcake Recipe:

1 Box Duncan Hines strawberry cake mix
3 eggs, room temp
1/2 cup milk
1/2 cup sour cream
1/3 cup vegetable oil
1/2 cup of strawberry jelly or jam, NOT PRESERVES

Sift the cake mix and then add the milk, sour cream, oil and , mix to combine, add the eggs one at a time mixing between each addition, finally add the strawberry jelly/jam and mix again.  Batter will be a little thicker than normal.

Divide equally into cupcake cups or papers and bake in a 350° oven for 18-21 minutes

Chocolate Ganache Recipe:

12oz bag of semi-sweet chocolate chips
3/4 cup heavy whipping cream
6 Tablespoons butter

In a small saucepan melt the butter then add the cream and stirring constantly bring the mixture to ALMOST a boil, do not boil.  Pour the liquid over the chocolate chips and let it sit for about 30 seconds and then using a small wire whip whip the chips and the liquid until you have a smooth, glossy ganache.

Fiori di Sicilia Buttercream Frosting Recipe:

2 cubes butter, softened
1/4 tsp salt
1 tsp vanilla
1/2 tsp fiori di sicilia extract (citrus-vanilla flavor)*
4-5 cups sifted powdered sugar
drizzle of cream or milk as needed if too thick

*may replace this extract with another tsp of vanilla

Place the butter in the bowl of mixer and let it whip for a couple of minutes until it is light and fluffy, gradually add about half of the sugar, then the extract, the remainder of the sugar and the cream/milk as needed. Adjust the mixer to medium and let it mix for a few minutes - it will be beautifully creamy and fluffy.

To assemble the cupcakes, bake the cupcakes, let them cool, equally distribute the ganache on the cupcakes, let it cool completely then using a wilton 2D tip frost the cupcake, sprinkle on some jimmies and then top with a red Sixlet and add the piece of cut straw.

The yield in the cupcake cups is 20, if you use regular cupcake papers your yield will be 24.

Resource:

Fiori di sicilia extract, Link 
Red & White Straws, Bella Cupcake Couture Paper Party Striped Straws, Red/White
Red Sixlets, Red Sixlets Candy 1LB Bag
Mixed Jimmies, CK Products 16 Ounce Jimmies/Sprinkles Bag, Mixed
Simply Baked Baking Cups, Simply Baked MA-002 RED 25-Pack Paper Cupcake Baking Cups, Small, Red Dot


Thank you for stopping by.


Wednesday, April 22, 2015

CARI'S KITTY AND ARROW & AN ANNOUNCEMENT!


For sometime now hubby and I have been considering making wood items out of barn, reclaimed and new wood for sale.  The wood arrow and Cari's Kitty could be called a prototype.  This is a gift for a friend's daughter. The friend has been very supportive and encouraging about our future endeavor.  Hubby just became a bionic man with a new knee so it will be awhile before he is back in the shop.

We still had some pieces of the barn wood that we sourced last summer and wanted to try our hand at making a rustic arrow and some items to hang from the arrow.  As you can see we have embraced the knot holes and imperfections of the wood.  Hubby and I collaborated on the design (he of course does all the saw work and first sanding) and in the end I insisted on the heart because I feel our little handmade items come from the heart.  Is he not just the sweetest to cut out these little hearts, I am sure the itty-bitty things are not easy to cut our using a saw?  He mixes a witches brew to paint on the edges where the wood was cut and new wood is exposed. We thought this arrow might be a good start for our business and we would make all kinds of items to hang from the arrow, for holidays, seasons, etc. We also plan on making signs for sale.
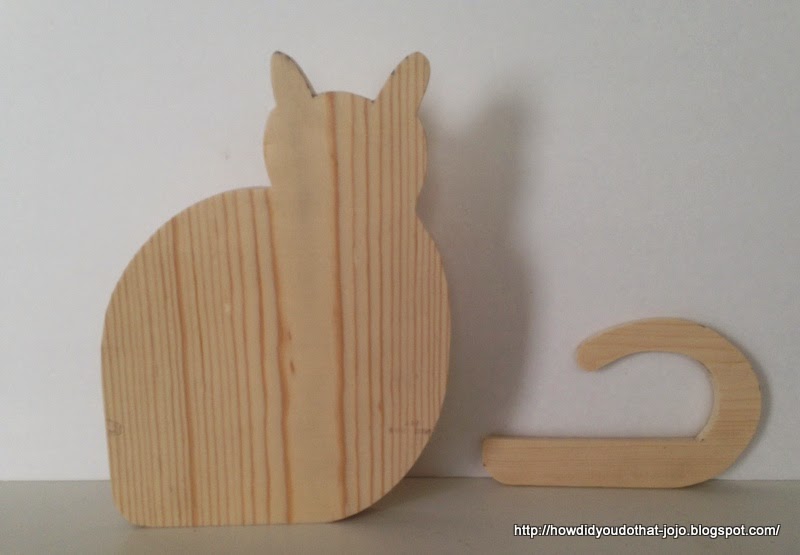
We had made the bunny at Easter and so for Cari I decided a cat might be nice. We did not have barn wood wide enough so we had to use new wood.  We are looking for more barn and reclaimed wood.  Here's how it works - I do the design, hubby takes my drawing, makes a pattern then cuts them out and does the first sanding and back to me for the finish.
First painting and some light sanding - complete with a little pink nose.
More sanding.....

Just a tad more sanding...
Finally I made my own witches brew and did the final coat of paint and some more sanding.  Ready to attach the tail and a couple of coats of matte clear coating, kitty's accoutrements and hangers for the arrow.
Here is kitty all gussied up and ready to hang...after hubby nailed/affixed kitty's little extras....


We recommend hanging the arrow and kitty (or any other hanging item) on a porch or any other area where it will be somewhat protected from the elements - at least directly. 


If you think you might be interested in products that we make or have requests or questions then go to http://barnowlmercantile.blogspot.com/ and sign up for email and when we launch and then add new products you will be notified by email.

Thank you so much for stopping by.

Monday, April 20, 2015

ELEVATING THE UBIQUITOUS FEED SACK TOWEL

A BFF of my sister (and a dear friend of mine too) recently said she was going to send me a ceramic tile she was making just for me - be still my heart as she is a real artist - her quilts belong in museums, she just does wonderful things.  I was a little surprised when the box arrived as it was way too big for a small tile.  Well (I love surprises like this, don't you?) inside was not only the tile but the most adorable Lori C. Mitchell "I Believe" figurine and then a feed sack towel - very large size, 32"x36" with two bands of cotton fabric sewed on one end of the towel - one band about six inches and the other about 2" - the bands are made of vintage fabric from the 30's, 40's, 50's.  Topped off by her embroidery design of a very folk art angel matching the tile.  She insisted on my using this for a kitchen towel and I would have none of that - this is a little work of art to be framed and go where my folk art goes.....to my guest room! Thank you again GC!
Here is the beautiful and fun folk art ceramic tile which took me all of two seconds to unwrap and find a little simple, rustic easel and set on one of the bedside chests in my guest room.  I love it so much!
This post is not just about my good fortune to have such a talented friend but to show what some fabric, a frame and some Annie Sloan paint and wax when used carefully, can make some really nice art work that you have created.  Hubby made the frame for me but you could use any open frame or for that matter a frame with glass.  I took the frame to Hobby Lobby and for very little they put in UV glass, the backing and the inserts to hold the backing and the wire holder.  You can use your 40% coupon for the most expensive part, the UV glass (if you provide your own frame as I did) so the final cost was $17.80.
I used masking tape and taped around the glass and then applied two coats of Annie Sloan Emperor's Silk.
Once the paint is dry you apply a coat of clear wax - I find the waxing process to be Zen-like as you just apply a thin coat and rub and rub with a clean cloth - I save Hubby's old tee shirts and cut them up for my cloths.
Let the first wax dry and then apply a thin coat of the dark wax.  If you put on too much of the dark, add some of the clear and rub.  The application is the same for the dark as the clear - rub, rub, rub.
Finished product - a beautiful red, not too bright but the coats of wax adds depth to the look.  I know I keep saying this but Annie Sloan's products are worth every penny they cost and are such a joy to use and so easy to get a great outcome.
Here is the portion of the feed sack towel that I wanted to show in the frame.  This photo does not do the towel justice as it is just wonderful, whimsical and folk arty and it is just so special to have a gift from someone that you know they took their time to create this just for you. I am so taken with the towel that I have already purchased some of the big towels and searched Etsy for some wonderful vintage fabric and will be making some of these for gifts.  I found a simple pattern for the embroidery and when I make mine I will be doing a blog post with full instructions.
The best way I know to frame fabric is to measure the middle of the frame board and draw a line down the middle then find the middle of your fabric and on the wrong side draw a line down the back and then match these two lines taking your fabric fold just like wrapping a package - do the sides first, then tape with duct tape (you can see the white tape I used above) then fold and tape the top and the bottom, slide back into the frame, bend down the little metal pieces holding in the project and the glass and you are done.  This was a little different as I had a lot more fabric than I normally would if I were just framing a piece of fabric.  I do not recommend putting a backing on framed fabric as sometimes fabric will stretch and sag and you want to be able to pull out the fabric and make it taunt again.
Here it is ready to go into the frame - I just need to tighten the area under the checkerboard embroidery.
I love the way this came out and am only sorry that the photograph is not better but it is really hard to take a photo of something that has glass because of reflection.  Just as my friend elevated the feed sack towel by adding the strips of vintage fabric and her lovely original embroidery picture, I think that framing it in a lovely frame has elevated it once again.

UV glass, wire and board for frame, Hobby Lobby
Annie Sloan paints, waxes and brushes, specialty stores
Vintage fabric, Ebay and Etsy
Large feed sack towels, Herrschners, Link

Thank you for stopping by.